We are thrilled to have you as part of our “pressurized family” and have created this article to hopefully answer many of the questions our customers have regarding the safety valve located on the top of our regulator caps.
The Safety Valve Is Comprised of 4 Parts.
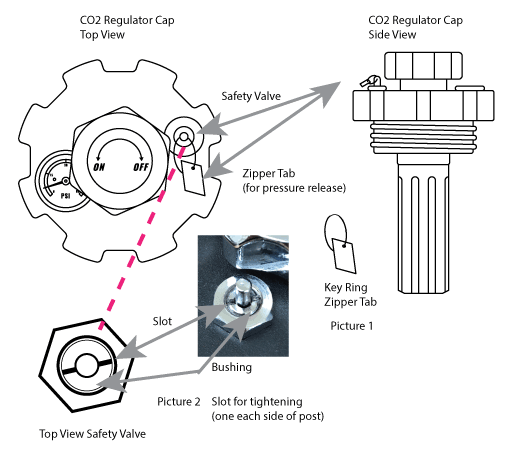
- Safety Valve Stem
- Bushing
- Key ring (looks like a key chain ring)
- The Zipper tab (looks like a square piece of metal on the ring).
How The Safety Valve & Bushing Work
Inside the safety valve and under the bushing is a spring that holds a seal in place. Under normal use the safety valve will allow the pressure inside your growler to build until it exceeds the force of the spring at which point it will push open the seal “blow” and release any gas build up until the spring can push the seal closed again.
The bushing is a screw, that as you tighten, compresses to push harder on the seal. If you turn the bushing to the right it will create more tension and increase the maximum pressure of the unit. If you turn it left it will relax the spring and lower the maximum release pressure of the valve. Make sense?
Each complete pressurized growler or individual regulator cap is shipped with its bushing dialed about 70% of the way down. This is done to prevent over pressurizing and gives a nice max pressure for each growler of about 15 PSI. We feel this is a pretty common max pressure for most carbonated beverages such as many beer styles and even Moscow mules.
Over time and with normal use the bushing can loosen. If this happens, or if you would prefer a higher or lower max PSI pressure, just dial it in by following the directions below!
Most Common Issues
The safety valve stem releases air when bumped
Solution: Tighten the bushing.
The safety valve is releasing gas “blowing” at very low pressure
Solution: Tighten the bushing
There is a slow leak from the safety valve
Solution: Tighten the bushing.
How To Adjust The Safety Valve Bushing
- Optional – Remove Key Ring and Zipper Tab from Safety Valve Post (Picture 1).
- Find slots on bushing (Picture 2).
- Tighten bushing (clockwise to increase pressure, counterclockwise to decrease). use bent nose needle nose pliers, or sharp pointed pliers, or pointed scissors.
- 1 turn is usually enough to do the job
If Nothing Else Works
One last thing to try, would be immersing the entire growler (pressurized) in water to visually inspect the unit for leaks.
If you have exhausted the above and CO2 continues to leak, the valve spring or seals may have been damaged. In this case cap must be returned for replacement. To request a replacement please contact us to start the process.
Note: A piece of duct tape may hold the valve in place just as a temporary solution (until growler is emptied!)